# 环境搭建
以下内容,以 Windows 10 操作系统为例,介绍运行所需软件的下载、安装、配置等。
# 运行环境
- JDK 11 + 或 OpenJDK 11 +
- Redis 4.x/6.x +
- MariaDB 10+、MySql 5.7+、Oracle、SqlServer、达梦等
- Nacos 2.0.3 +
# 开发工具
- IntelliJ IDEA
开源项目作者可申请免费序列号证书 - Visual Studio Code
- Node 16.x/18.x/19.x +
- Maven 3.x +
- Git
# JDK 安装配置
# 下载并安装 OpenJDK 11
# 系统环境变量配置
- Win开始-鼠标右击 -> 系统 -> 关于 -> 高级系统设置
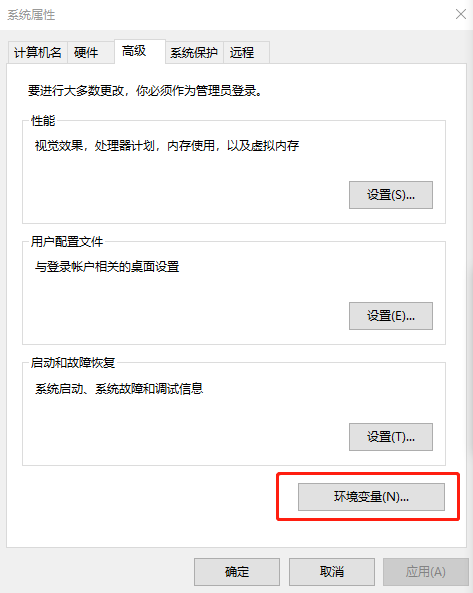
- 配置
JAVA_HOMEC:\jdk-11 目录
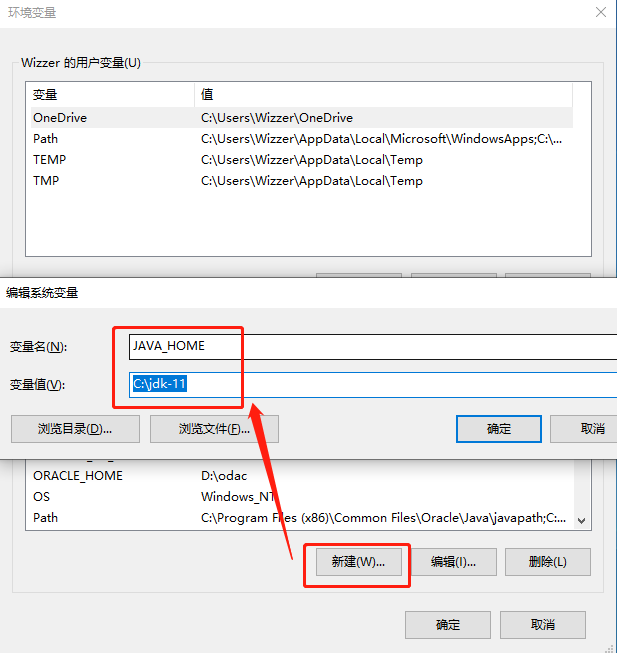
- 配置
PathC:\jdk-11\bin 目录

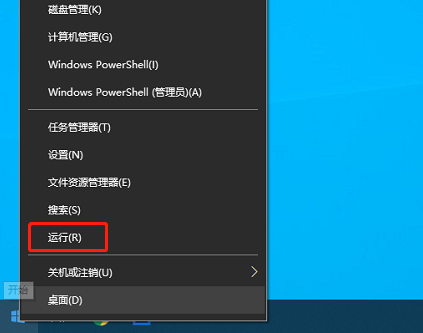
Win + R 热键或 Win开始-鼠标右击 -> 运行cmd->java -version检查配置是否正确


# Redis 安装配置
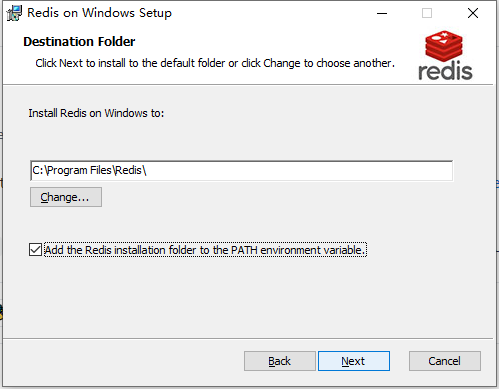
# 下载并安装 Reids 5.0.10
Windows/x64 msi https://github.com/tporadowski/redis/releases (opens new window)
将 redis 文件夹加入到环境变量
- 运行
cmd->redis-cli检查 redis 安装是否正确

# MariaDB 安装配置
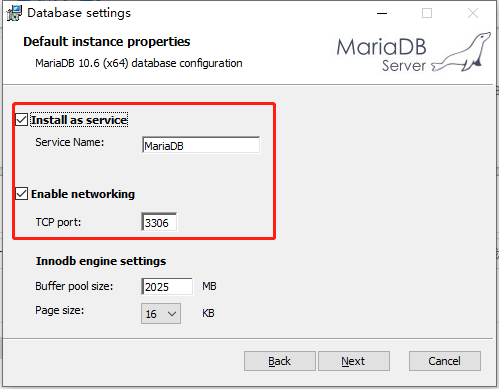
# 下载并安装 MariaDB 10.6.4
Windows/x86_64 msi https://mariadb.org/download/ (opens new window)
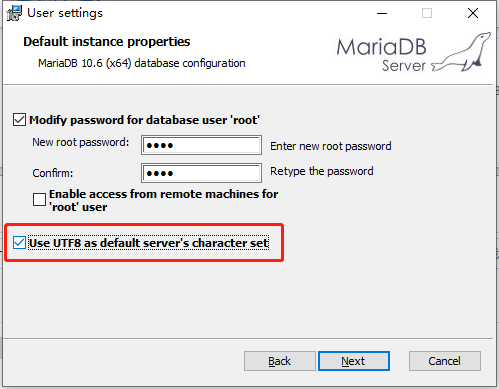
设置密码为
root开发环境的密码可以简单点,生产环境禁止使用此密码默认使用
UTF8字符集
# Nacos 安装配置
# 下载 Nacos 2.0.3
- nacos-server-2.0.3.zip https://github.com/alibaba/nacos/releases (opens new window)
# 安装及配置 Nacos
将 zip 文件内 nacos 文件夹解压至
D:\server\nacos用记事本打开
D:\server\nacos\bin\startup.cmd文件,将运行模式改成standalone并保存文件
set MODE="standalone"
- 用记事本打开
D:\server\nacos\conf\application.properties文件,修改数据源并保存文件
### If use MySQL as datasource:
spring.datasource.platform=mysql

### Count of DB:
db.num=1

### Connect URL of DB:
db.url.0=jdbc:mysql://127.0.0.1:3306/nacos?characterEncoding=utf8&connectTimeout=1000&socketTimeout=3000&autoReconnect=true&useUnicode=true&useSSL=false&serverTimezone=UTC
db.user.0=root
db.password.0=root
- 在数据库中创建
nacos数据库并导入数据,以 MariaDB 安装自带的 HeidiSQL 客户端工具为例
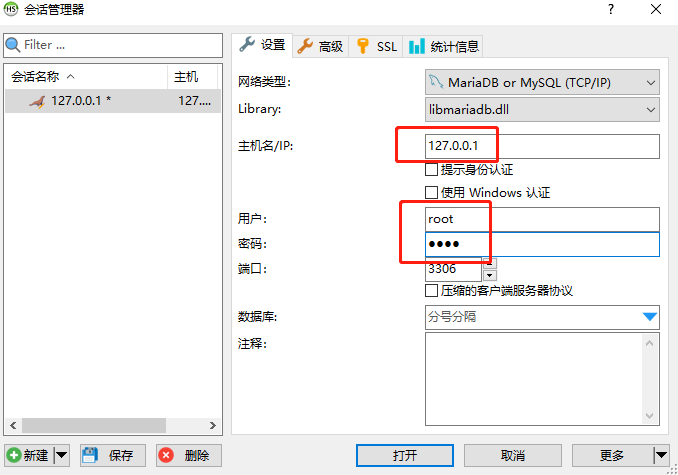
- 选择服务端一致的
utf8mb3_general_ci字符集

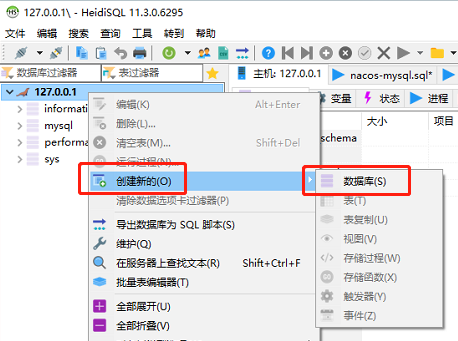
- 选中
nacos数据库,HeidiSQL菜单 文件 -> 运行SQL文件 -> 打开并运行D:\server\nacos\conf\nacos-mysql.sql文件
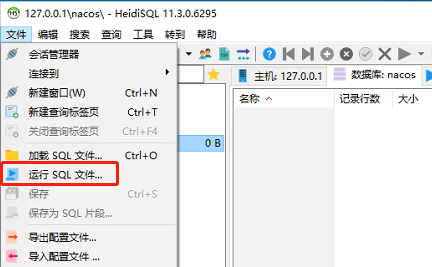
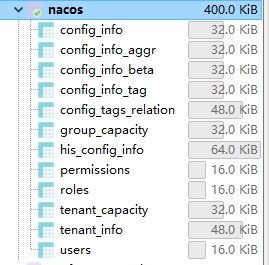
- 执行后右击
nacos数据库 -> 刷新 ,就可以查看到相关表了
# 运行 Nacos
鼠标双击
D:\server\nacos\bin\startup.cmd文件启动完成后,浏览器打开 http://127.0.0.1:8848/nacos (opens new window)
输入用户名
nacos密码nacos即可进入管理后台
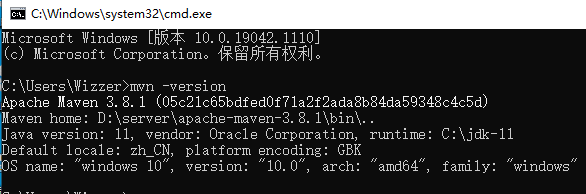
# Maven 安装配置
# 下载 Maven 3.8.1
apache-maven-3.8.1-bin.zip https://maven.apache.org/download.cgi (opens new window)
将 zip 文件内 nacos 文件夹解压至
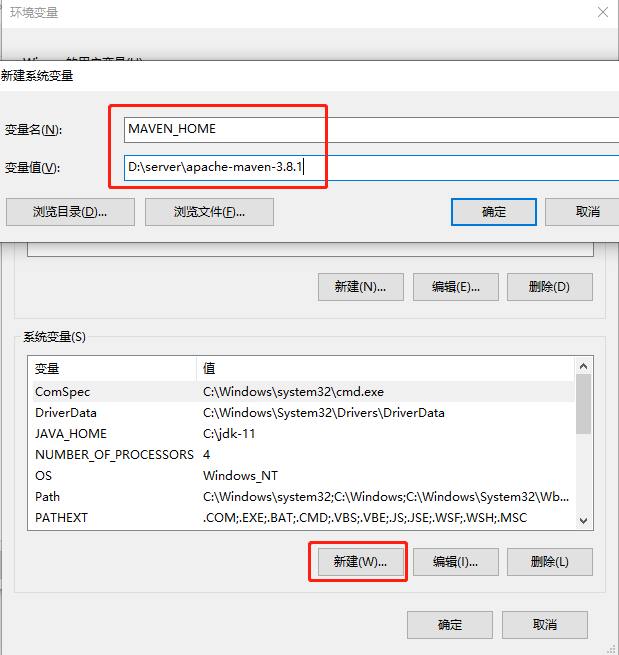
D:\server\apache-maven-3.8.1配置系统环境变量
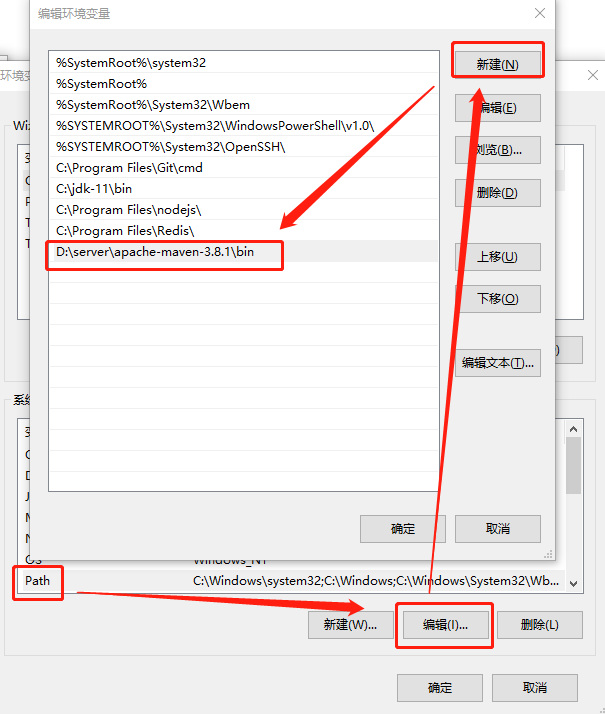
- 运行
cmd->mvn -version检查 maven 安装是否正确
# Maven 仓库配置
- 如果配置过镜像库,例如阿里的镜像库,您的
settings.xml里应禁止将mirrorOf配置为 * 号(星号代表全部,无论是release还是snapshots都代理,会导致所有第三方快照库的设置都失效) - 以下为正确配置:
<mirror>
    <id>nexus-aliyun</id>
    <mirrorOf>central</mirrorOf>
    <name>Nexus aliyun</name>
    <url>http://maven.aliyun.com/nexus/content/groups/public</url>
</mirror>
# Git 安装配置
# 下载 Git
- 64-bit Git for Windows Setup https://git-scm.com/ (opens new window)
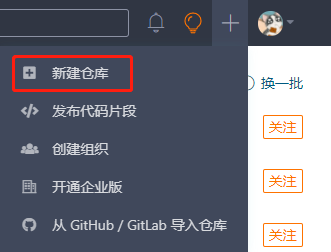
# 创建仓库
以 https://gitee.com (opens new window) 为例演示创建仓库、配置SSH密钥、创建仓库、提交文档等过程。
- 主页右上角选择
新建仓库
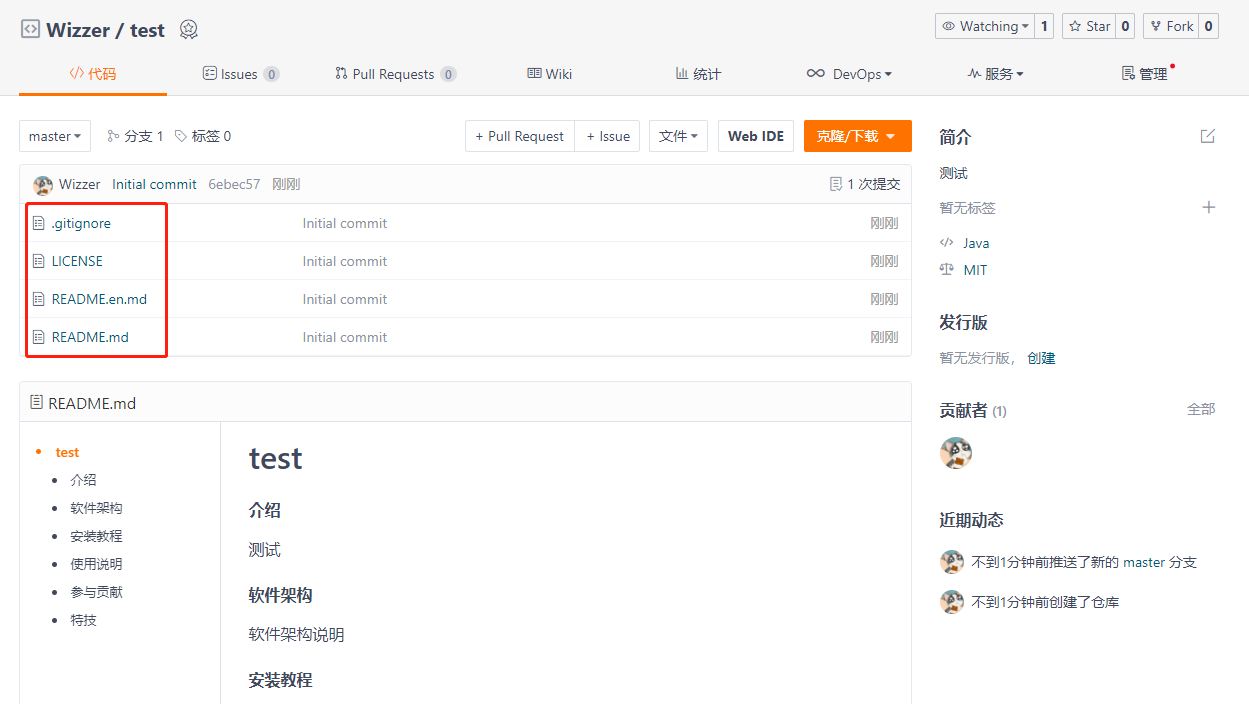
- 选择
开发语言、.gitignore 忽略提交配置文件、开源协议,设置Readme文件进行创建

- 创建完成
- 右上角
设置,选择SSH公钥,生成并配置SSH公钥后,即可在电脑上提交文件
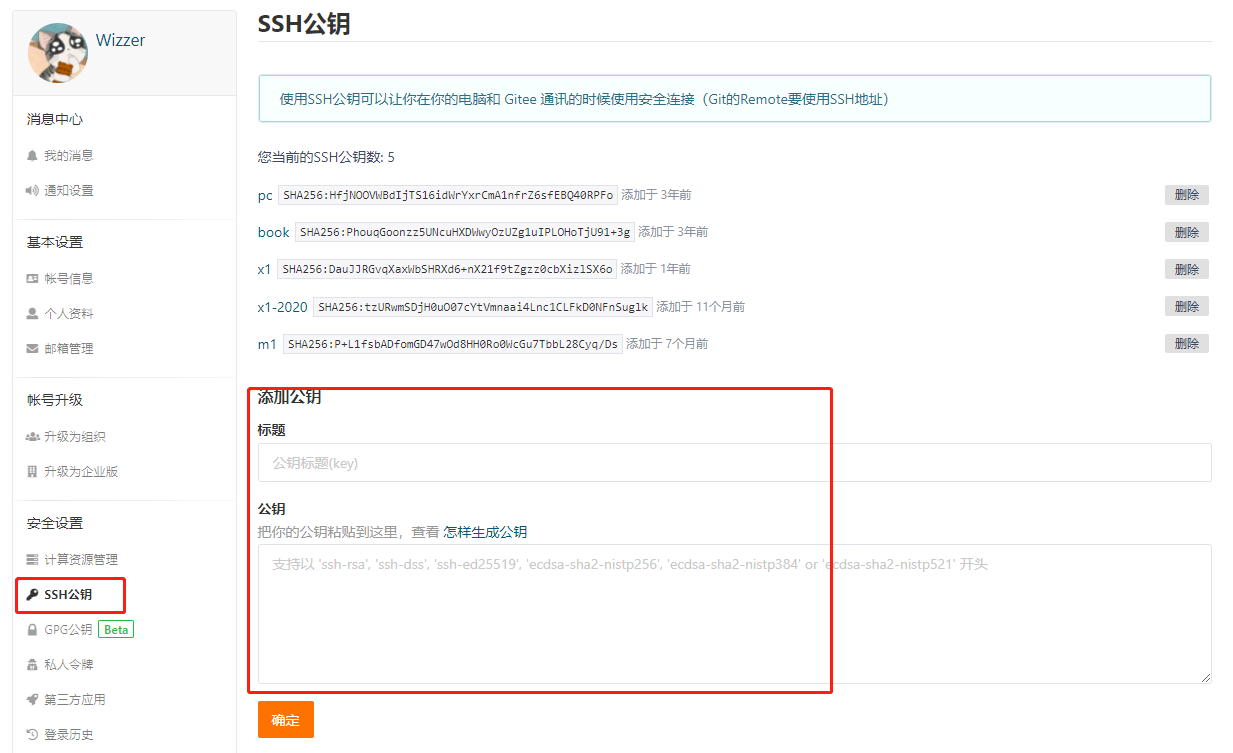
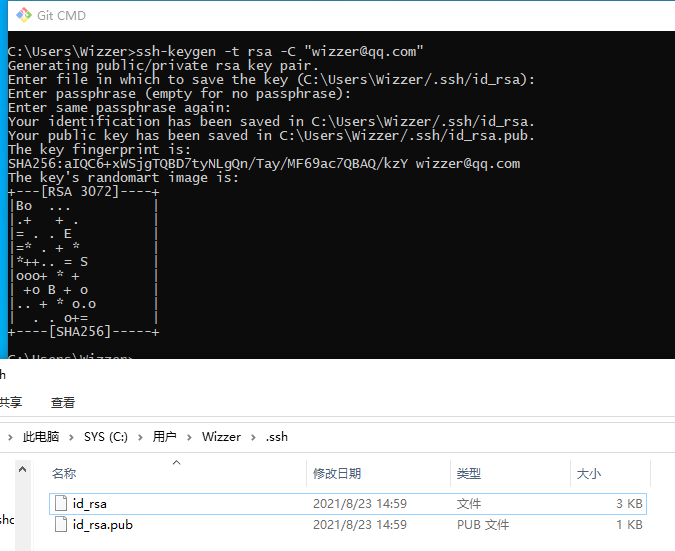
# 生成SSH公钥
文档说明 https://gitee.com/help/articles/4181 (opens new window)
打开
Git CMD命令行,输入以下内容(邮箱地址记得修改成自己的):
ssh-keygen -t rsa -C "wizzer@qq.com"
- 第2行是否重命名,直接回车,第3行是否设置密码,直接回车,第4行重复输入密码,直接回车,会在
C:\Users\计算机名\.ssh下创建id_rsa私钥文件和id_rsa.pub公钥文件
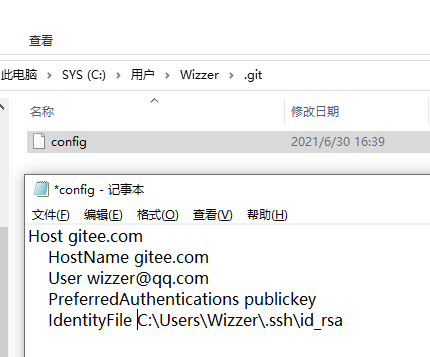
用记事本打开
id_rsa.pub公钥文件,把文件全部内容复制粘贴到gitee或github等仓库用户中心的SSH公钥里鼠标在电脑桌面上右击,新建文本文档,修改文件名称为
config(注意:没有后缀名),粘贴以下内容,保存并复制到C:\Users\计算机名\.ssh目录下
Host gitee.com
    HostName gitee.com
    User wizzer@qq.com
    PreferredAuthentications publickey
    IdentityFile C:\Users\Wizzer\.ssh\id_rsa
- 邮箱地址记得修改成自己的
# Git命令
- 打开命令行,切换到 D盘,使用
git clone克隆项目文件
C:\>D:
D:\>mkdir java
D:\>cd java
D:\java>git clone git@gitee.com:wizzer/test.git

- Git常用命令
git pull                    #下载更新文件
git add 1.txt               #添加待提交文件
git commit -am "add: 1.txt" #注释说明提交内容
git push                    #提交文件
git status                  #查看状态
# Node.js 安装配置
# 下载 Node.js
Index of /dist https://nodejs.org/dist/ (opens new window)
找到
v19.2.0,下载node-v19.2.0-win-x64.zip文件,进行安装前端 Vue3 项目
wk-vue3-admin兼容 Node.jsv16.xv18.xv19.x版本,更高版本请自行测试命令行执行
npm install -g pnpm,安装pnpm包管理工具将包的源改为阿里源,提升包下载速度
npm install -g mirror-config-china --registry=https://registry.npm.taobao.org
← 项目介绍 30分钟内把项目跑起来 →